Support
Let NL-ix help you to get the most out of your connections
ONBOARDING INFORMATION
What happens after I have placed my order?
If you have placed an order at the NL-ix you will receive an 'order confirmation' mail. This mail contains your order number and a 'Follow your order' button, which brings you to My NL-ix where you are able to track the status of your order.
After the order confirmation has been send, the NL-ix provisioning team gets to work to deliver your order. When the order has been delivered, for normal products usually within 10 working days after the order confirmation, the provisioning team will send an ‘order delivery’ email. This email contains all details you need to setup your connection. The delivery date is aso the start date of invoicing.
Order Provisioning
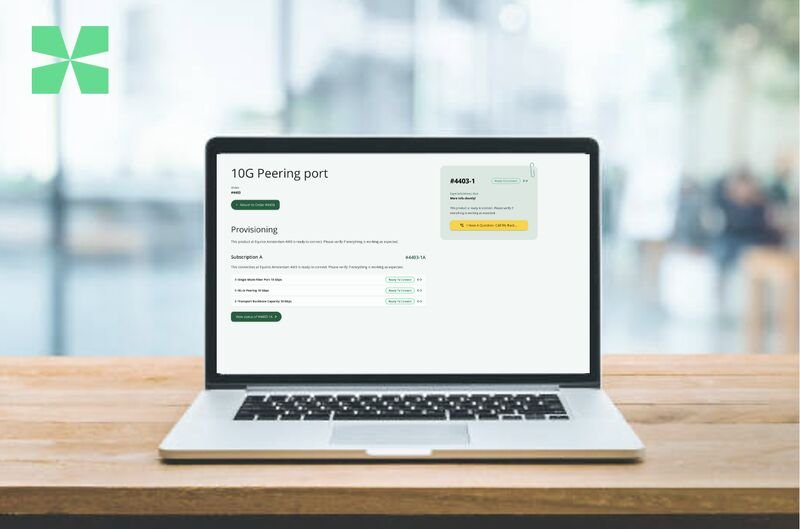
- The ‘Follow your order’ button allows you to follow your order
- Technical details required by NL-ix in order to provision your order have the status ‘Information Needed’
- If applicable, NL-ix will send the Letter of Authorization (LOA) once we have received all requested technical details – the LOA is a .PDF which you will receive per email
- The expected delivery date of your subscriptions is displayed at the top right corner within 2 working days
- Once provisioning has been completed, the status will change to ‘Ready to Connect’ – you will receive an email with technical details for setting up your service

When is start billing?
After the order confirmation has been send, the NL-ix provisioning team gets to work to deliver your order. When the order has been delivered, for normal products usually within 10 working days after the order confirmation, the provisioning team will send an ‘order delivery’ email. This email contains all details you need to setup your connection. The delivery date is aso the start date of invoicing.
How do I order the cross-connect?
Once your order is placed, NL-ix will forward you a CFA/LOA for you to order a cross-connect into the IX node present in your selected facility. You are responsible for arranging and paying for the cross-connect to reach the IX fabric.
Troubleshooting layer-1
If after connecting the port to port cross-connect cabling the lights above the port do not turn green, please try to switch the send and receive connector of your port to port cross-connect cabling. If the lights still doesn’t turn green please investigate the following possibilities:
- Is Rx/Tx connected correctly - check if swapping Rx and Tx will solve the issue?
- Is the port on the other side enabled and connected?
- Is auto-negotiation configured on the other side?
- Are there switches or transceivers in-between which are not configured yet?
- Did you use the GBIC or SFP with the same port type as specified at port details?
- Is the cable okay? Please have the datacenter check the cable and connectors.
- Is the port speed configured as ordered?
- Does the optic match the speed of the interface?
If the port still does not come up, please contact us, and we will check the port configuration on our side.
How to get your layer-2 interface up and running and start using the services?
When you have the cross-connect in place and you have received the 'order delivery' e-mail, your NL-ix connection is physically ready to be used.
Please note that once the port is up, you need to configure the port at your end. You will find all required information such as port setting, VLAN-ID and/or IP Config in the 'order delivery' email you have receive upon delivery.
You can find more detailed information in the "CONFIGURATION GUIDE' section.
How can I add/change the MAC address of my router and information on MAC access-list
We have layer-2 access-lists enabled on all of our interfaces for Peering, Transit and VLAN-connections. Only one MAC address is allowed per VLAN/service per port, so any intermediate switches should be made silent.
To prevent problems on our and your infrastructure all ports have port security / access lists and storm control enabled.
Customers who intend to swap Routers or otherwise change their MAC address should coordinate this change in advance by configuring the new MAC in the My NL-ix portal. You can add or change the allowed MAC-address of your router via the My NL-ix portal, via Ports > Manage MAC Address which will automatically also add/change it to the access-list.
In the event of an after-hours emergency necessitating our help on a MAC change, please call our NOC
Information Regarding MAC Filtering
NL-ix only permits 1 MAC address per port so any intermediate switches should be made silent.
During turn up, customer’s routing equipment is put into quarantine status to check for common configuration mistakes and to prove that it is suitably configured to participate in the peering fabric. Once verified, customer is placed out of quarantine, moved into production VLAN, and the MAC address of customer’s Routing equipment will be noted and configured. The configured MAC address will stay locked and enforced using L2 ACL. No frames with different source MAC addresses are allowed to enter the peering fabric.
The implementation of MAC filtering is important to protect the NL-ix Peering infrastructure against loops. Customers who intend to swap Routers or otherwise change their MAC address should coordinate this change in advance by configuring the new MAC in the My NL-ix portal. In the event of an after-hours emergency necessitating our help on a MAC change, please call our NOC
Port settings & VLAN-tagging
Please set the gigabit port configuration to ’auto negotiate’, otherwise the connection might not come up at all or stay down after a reset. For fast ethernet ports, enable ’auto negotiate’ and disable all auto-crossover features.
The connection delivery mail states if you must tag your interface or not, this differs per NL-ix service.We use industry standard IEEE 802.1q VLAN trunking, please see your vendor manual for information on how to tag your frames.
Route Server setup for Peering
NL-ix operates multiple Route Servers. Even though Peering with only one Route Server is sufficient for exchanging routes, it is preferred to peer with all Route Servers available in your setup. Setting up redundant Route Server peers allows to carry out occasional maintenances without impacting your routing and guards against failures.
Preferably always setup 2 IPv4 sessions as well as 2 IPv6 sessions. This way the Route Servers help to get the majority of possible sessions and significantly leverage the burden of keeping track of newly arriving members.
Route Server
NL-ix AS34307:
RS1 - 193.239.116.255 - 2001:7f8:13::a503:4307:1
RS2 - 193.239.117.0 - 2001:7f8:13::a503:4307:2
NL-ix2 AS42604:
RS1 - 185.1.122.127 - 2001:7f8:cd::a504:2604:1
RS2 - 185.1.122.128 - 2001:7f8:cd::a504:2604:2
RPKI filtering and RIPE administration
NL-ix secures "our part” of the Internet by protecting the peers connected to our Route Servers by actively clean-filtering all routing information using RPKI: a security framework that verifies the right to use an IP address or ASN. By default NL-ix declines routes where RPKI-validation fails.
Signing your prefixes in the routing database of RIPE is the best way to start with RPKI as the RIPE database provides essential information to keep individual networks and the overall Internet running.
Please make sure that you cover all prefixes you use, matching the ASN which they originate from. Also have all active ASNs and AS-SETs listed in your main AS-SET and remove unused ones. Please send an email to sales@nl-ix.net if you require changes your AS-SET.
You can check on the status of your AS in the routing databases.
TRAFFIC ROUTING
BGP communities Peering
Traffic over the NL-ix Route Server can be managed via BGP communities or the Route Server Configurator (filter.nl-ix.net). Please note that you should make a choice for either the communities or the GUI of the Route Server Configurator. Using both may result in unexpected behaviour. The GUI will not show any communities that are set manually.
Click here for further information on BGP Communities
BGP communities Joint Transit
NL-ix offers BGP communities to all customers using Joint Transit for AS24785 as a standard service feature. This gives control over how your prefixes are announced to your upstreams or provides information to act on.
Click here for further information on BGP Communities for Joint Transit
Bogon and martian filtering, BGP filtering
Bogon and martian filtering
A bogon prefix is a route that should never appear in the Internet routing table. A packet routed over the public Internet (not including over VPNs or other tunnels) should never have an address in a bogon range. These are commonly found as the source addresses of DDoS attacks.
Bogon filtering filters bogus (fake) IP addresses of a computer network. Bogons can be filtered by using router access-control lists (ACLs), or by BGP blackholing. Full bogons filtering is recommended but not enabled by default. You can start bogon filtering here
BGP filtering
NL-ix advices customers using Peering to follow the BGP Filter Guides
Blackholing
For customers that have a host or block under a DDoS, the affected host/block can be advertised with a blackhole community. This will cause all traffic to that host/block to be blackholed at the core of our network. Once the attack has stopped, the community can be removed again in order to start receiving traffic again. NL-ix supports to announce a prefix length up to /32 for IPv4 and up to /128 for IPv6
Blackhole RFC7999 - 65535:666
Blackhole Joint Transit - 24785:666
Blackhole OpenPeering AS20562 - 20562:666
Example
Below is an example for a Cisco router for OpenPeering:
ip route 192.168.1.1 255.255.255.255 Null0
router bgp 6500
network 192.168.1.1 255.255.255.255 route-map blackhole
route-map blackhole permit 10
set community 20562:666
How to maximise traffic with Peering
A guidance on how to start with Peering and maximise traffic can be found here
Route Server Configurator
The Route Server Configurator provides full control over the route server by making it easy to select networks you want to exchange traffic with based on latency times, geographical location and black & white lists.
Click here for more information on the Route Server Configurator
ICON
An intuitive web interface that offers complete control and insight into (historical) internet traffic. It provides a detailed overview of latency, bandwidth and routes, which allows you to trace problems that lie outside the traditional company network much faster.
Click here for more information on ICON
Add VLAN to existing MPLS Transport ports
You can use this form in case you would like to add an MPLS Transport VLAN to an existing port(s)
CONFIGURATION GUIDE
Peering
When the order has been delivered, you will receive an ‘order delivery’ email. This email - send to you from provisioning@nl-ix.net - contains all details you need to setup your connection. The delivery date is also the start date of invoicing.
Next steps
- You can update your MAC address of your router via the My NL-ix portal, via Ports > Manage MAC Address.
- Setup the connection using the information given in de 'order delivery email' and test the connection.
- Update your PeeringDB page.
Technical Requirements
All members’ use of NL-ix infrastructure shall conform to the relevant standards as laid out in STD0001 and associated Internet standardisation documents.
Each participant’s network must have an ASN (Autonomous System Number) assigned by an appropriate LIR or RIR (Regional Internet Registry), being either ARIN, RIPE-NCC, APNIC or LACNIC. During the application process this assignment will be checked.
Physical
Ethernet ports into NL-ix are offered in following configurations:
1GE – 1000Base-LX
10GE – 10GBASE-LR
Nx10GE – Link Aggregated
100GE – 100GBASE-LR4
Nx100GE – Link Aggregated
NL-ix supports standard single-mode (10km 1310nm) optics by default. For an additional charge, customer may request specialised optics, including extended reach optics in any common 100 Ghz DWDM or CWDM bands.
Options
By default, NL-ix Peering will be offered at line rate.
1G/Nx10/Nx100G
MTU
For the peering LAN an MTU of 1500 bytes is used.
VLAN-tagging
Peering VLAN ports (VLAN 7) must always be tagged.
We use industry standard IEEE 802.1q VLAN trunking, please see your vendor manual for information on how to tag your frames.
MAC address filtering
The Peering service can be used with one MAC address. This MAC address will be configured in the ACL belonging to the customer port. It's not allowed to have multiple MAC addresses configured on the port. Traffic originating from other source MAC addresses is discarded.
Frame types
The following ethernet frame types are accepted:
0x0800 – IPv4
0x0806 – ARP
0x86dd – IPv6
All others are discarded.
Not allowed traffic
The following traffic is explicitly not allowed on the NL-ix Peering VLAN 7:
All broadcast and Non-IP protocols must be disabled facing the IX fabric, or filtered in some way when disabling is not an option. These include, but are not limited to forwarded DHCP, MOP, Ethernet Keepalives, LLDP, CDP (Cisco Discovery Protocol), VTP (VLAN Trunk Protocol), DTP (Dynamic Trunking Protocol), EIGRP (and other IGRP’s), BOOTP, PIM, UDLD
BUM traffic
Only ARP and multicast IPv6 Neighbor Discovery packets are allowed.
NetBIOS and IPv6 Router Advertisements
- IP/ICMP Redirects, IP Directed Broadcast and Proxy Protocols including Proxy ARP and IPv6 Proxy Neighbor must be disabled on IX facing interfaces.
- Layer-2 protocol traffic: spanning-tree must be disabled on IX facing interfaces.
- All Interior Gateway Protocols (IGPs, such as OSPF, IS-IS, RIP, etc) must be disabled on IX facing interfaces.
Open Peering
Interconnecting internationally to other networks via a Transit provider with a full or partial Routing BGP-table is a very effective Routing option. It can be used in combination with Peering either to improve and stabilise critical routes or to cut costs. Using multiple Transit providers over different ports guarantees redundancy. Open Peering is a tried and tested service offering full European coverage with the best routes available. It gives direct access to any network that peers on the Route Servers of all the major European exchanges, supplemented with bilateral peering sessions and the PNI’s of the Open Peering initiative.
Make sure that:
- You are only advertising routes you are allowed to advertise with prefix lists or similar;
- You are filtering bogon-routes in and outbound;
- You configure redundant sessions, both to Nikhef and Telecity 2.
- You have created RIPE Route-Objects and your AS-SET is correct and up-to-date.
Joint Transit
Joint Transit offers the best IP Transit option. We have created a unique blend from geographic Tier 1 and Tier 2 Transit specialists that guarantee the best routes to specific regions. Users can connect from around datacenters in most important European metropolitan markets in 7 countries, receiving more than 600.000 IPv4 prefixes.
Configuration Example
Below is an example on how to configure your Joint Transit service. This config snippet can also be used to configure your Open Peering product.
Cisco router - BGP
router bgp 65000
bgp router-id 1.1.1.1
bgp log-neighbor-changes
bgp graceful-restart
bgp maxas-limit 50
!
address-family ipv4
bgp dampening
redistribute static
exit-address-family
!
address-family ipv4 vrf internet
bgp dampening
redistribute static
neighbor 213.207.12.x1 remote-as 24785
neighbor 213.207.12.x1 description eBGP with Transit Nikhef
neighbor 213.207.12.x1 version 4
neighbor 213.207.12.x1 activate
neighbor 213.207.12.x1 remove-private-as
neighbor 213.207.12.x1 soft-reconfiguration inbound
neighbor 213.207.12.x1 route-map BGP-NLix-1-Ingress in
neighbor 213.207.12.x1 route-map BGP-NLix-1-Engress out
neighbor 213.207.12.x1 maximum-prefix 750000
neighbor 213.207.12.x2 remote-as 24785
neighbor 213.207.12.x2 description description eBGP with Transit Telecity2
neighbor 213.207.12.x2 version 4
neighbor 213.207.12.x2 activate
neighbor 213.207.12.x2 remove-private-as
neighbor 213.207.12.x2 soft-reconfiguration inbound
neighbor 213.207.12.x2 route-map BGP-NLix-2-Ingress in
neighbor 213.207.12.x2 route-map BGP-NLix-2-Engress out
neighbor 213.207.12.x2 maximum-prefix 750000
maximum-paths eibgp 4
exit-address-family
!
Please note that that Transit is always redundant. You can configure a session to both Nikhef and Telecity 2.
Cisco router - Prex Lists
ip prefix-list BGP-Engress-Out-Filter seq 1 permit 203.0.113.0/24 le 32
!
ip prefix-list BGP-Ingress-In-Full-Routing-Table seq 2 deny 0.0.0.0/0
ip prefix-list BGP-Ingress-In-Full-Routing-Table seq 4 deny 10.0.0.0/8 le 32
ip prefix-list BGP-Ingress-In-Full-Routing-Table seq 6 deny 172.16.0.0/12 le 32
ip prefix-list BGP-Ingress-In-Full-Routing-Table seq 8 deny 192.168.0.0/16 le 32
ip prefix-list BGP-Ingress-In-Full-Routing-Table seq 10 deny 224.0.0.0/4 le 32
ip prefix-list BGP-Ingress-In-Full-Routing-Table seq 12 deny 240.0.0.0/4 le 32
ip prefix-list BGP-Ingress-In-Full-Routing-Table seq 14 deny 127.0.0.0/8 le 32
ip prefix-list BGP-Ingress-In-Full-Routing-Table seq 16 deny 169.254.0.0/16 le 32
ip prefix-list BGP-Ingress-In-Full-Routing-Table seq 18 deny 192.0.2.0/24 le 32
ip prefix-list BGP-Ingress-In-Full-Routing-Table seq 20 deny 198.51.100.0/24 le 32
ip prefix-list BGP-Ingress-In-Full-Routing-Table seq 22 deny 203.0.113.0/24 le 32
ip prefix-list BGP-Ingress-In-Full-Routing-Table seq 24 deny 192.42.172.0/24 le 32
ip prefix-list BGP-Ingress-In-Full-Routing-Table seq 26 deny 198.18.0.0/15 le 32
ip prefix-list BGP-Ingress-In-Full-Routing-Table seq 99 permit 0.0.0.0/0 le 24
!
route-map BGP-NLix-1-Engress permit 10 match ip address prefix-list BGP-Engress-Out-
Filter
!
route-map BGP-NLix-2-Engress permit 10 match ip address prefix-list BGP-Engress-Out-
Filter set as-path prepend 206730
!
route-map BGP-NLix-1-Ingress permit 10 match ip address prefix-list BGP-Ingress-In-
Permit-Default-Route
set local-preference 100
!
route-map BGP-NLix-2-Ingress permit 10 match ip address prefix-list BGP-Ingress-In-
Permit-Default-Route
Please make sure to filter both inbound and outbound as shown above. This way you cannot inadvertently announce and receive prefixes you do not want. We recommend you filter bogon-prefixes from Team Cymru www.team-cymru.org.
MPLS Transport
VLL - Virtual Leased Line
Virtual Leased Line offers dedicated low-latency high-bandwidth capacity on Ethernet.
The Virtual Leased Line:
- Allows unlimited MAC addresses, Q-in-Q, MAC-in-MAC, MPLS and jumbo frames.
- Delivers a private circuit where traffic cannot be seen by other customers nor by NL-ix
- Can be delivered on any distance. NL-ix hides the distance between endpoints and repeats the signal along the way if needed.
Virtual Leased Lines (VLL) can be delivered over tagged as well as untagged ports. When your VLL is delivered on a port with multiple services, it will be delivered tagged. When you want to configure your own VLAN’s through a tagged VLL, make sure your equipment supports QinQ.
VPLS - Virtual Private LAN Service
The Virtual Private LAN Service (VPLS) is an Ethernet-based point-to-multipoint Layer 2 Virtual Private Network (VPN) that enables to connect geographically dispersed Ethernet Local Area Network (LAN) sites to each other across an MPLS backbone. For customers who implement VPLS, all sites appear to be in the same Ethernet LAN even though traffic travels outside of your own network networks of Service Providers.
- Connects multiple ports on one VLAN allowing communication between all ports on the VLAN.
- Allows one MAC address per port, which is enforced using port security.
- Supports standard seize Ethernet packets with 9000 bytes Ethernet packet payload. Therefore trunking, Q-in-Q, jumbo frames are not supported.
- Can be delivered on any distance. NL-ix hides the distance between endpoints and repeats the signal along the way if needed.
MAC address filtering for VPLS
The VPLS service can be used with one MAC address. This MAC address will be configured in the ACL belonging to the customer port. It is not allowed to have multiple MAC addresses configured on the port. Traffic originating from other source MAC addresses is discarded.
Cloud Connect - Microsoft Azure ExpressRoute
In order to setup a working ExpressRoute, different resources need to be created in the Azure domain.
It is important that the ExpressRoute resource is created with the correct parameters. The resources Connection and (ExpressRoute) Gateway, are merely 'linking' resources and fall inside the customer domain.
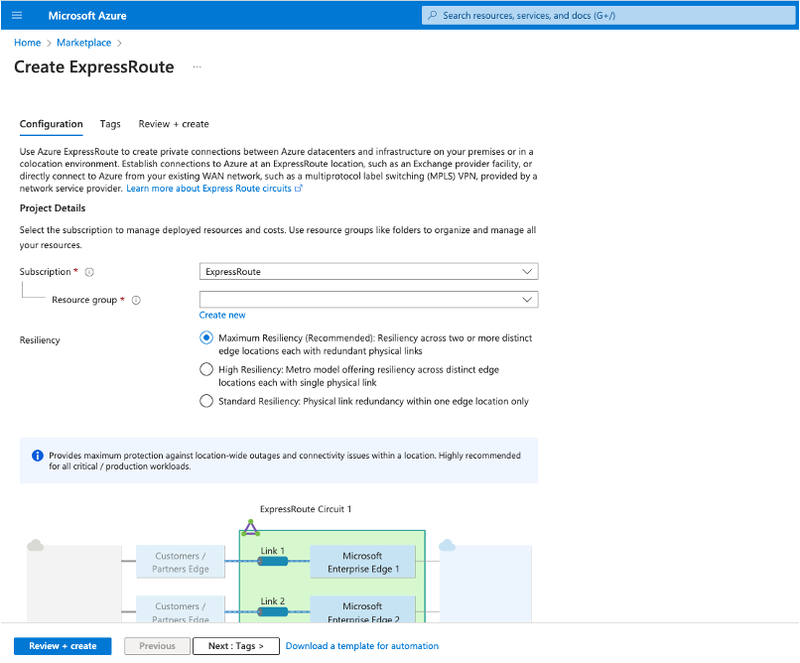
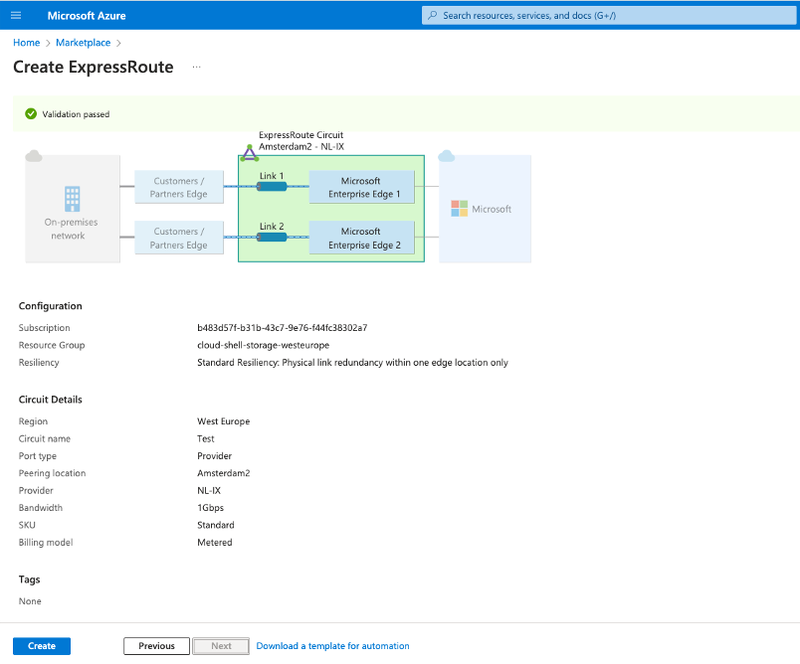
An ExpressRoute can be created via the Azure Portal or via the command line (cloud shell). In both cases, there are three properties that need to be set correctly. In the Azure Portal, these properties are found under the step Configuration:
- the Port Type needs to be set on Provider.
- the Provider needs to be set to NL-IX - available for Europe West or Europe North
- When choosing a provider, the next step is to pick the Peering Location:
- For the region Europe West, this is Amsterdam2
- For the region Europe North, this is Dublin2
NOTE: In case a different region-location combination is selected, it could be that the chosen location is used as a ramp-up; Microsoft in that case charges extra for sending the traffic over the Microsoft network to the correct region. For example, if the selected region is Europe North, but the Peering location is set to Amsterdam (which is a ramp-up for Europe West), the connection will be extended towards Europe North over the Microsoft network. This is an expensive option which is not recommended.


Cloud Connect - Google Cloud Platform Partner Interconnect
In order to get a Google Partner Interconnect working, several cloud resources are required within the Google domain, most importantly a Cloud Router connected to a VPC network.
With these resources in place, a create so-called VLAN Attachments can be created in the "Network Connectivity" → "Interconnect" menu. When doing this, the following things need to be taken into account:
- Create a "Partner Interconnect connection" and state that you already have a service provider. You don't need to state that it is NL-ix.
- Create a redundant pair of VLAN attachments (Technically, it is possible to create a single VLAN, please however make sure it is a redundant pair of VLAN).
- Give the VLAN attachment a name
- Set the MTU to 1500 - default, and also recommended by NL-ix
- The customer does not set a Bandwidth, NL-ix does this!
After the creation of the VLAN attachment, a 'pairing-key' generated that needs to be shared with NL-ix in order to identify the ordered InterConnects.
THE NL-IX NETWORK
About our Network
Our network is the heart of the Internet's core infrastructure. It is also the core of everything we do and as such of paramount importance to us. To build it as fast and resilient as technically possible and to keep it cost effective at the same time is a never ending challenge. And as true technicians we ❤️ a challenge.
Read here more about our network or about the network architecture
Information about the amount of Members, total traffic and sessions
Find here an overview of all Stats
Overview of Network Improvements
Find out more here about our latest network improvements
Distributed versus local Exchange
A distributed internet exchange model may not be the traditional approach, but it brings key advantages over a local exchange. Want to learn more?
Network Health Monitor
MetroNIDs everywhere!
If you value low latency just as much as we do, the Network Health Monitor as an absolute must!
Click here for more information on the Network Health Monitor
OTHER
Service Descriptions
Download here the Service Descriptions of your favourite services
How the Internet works
In today's digital age, the Internet has become an integral part of our personal and business lives. We rely on it for various tasks and accessing data. However, have you ever stopped to wonder how the vast amount of information we send and receive actually moves across the Internet? In this article, we'll explore the inner workings of the Internet, shedding light on the processes that occur behind the scenes and uncovering some lesser-known facts.
The advantages of having a Public ASN
The main advantages of having a Public ASN are:
- No Need to Change Your IP Range
- Multi-Homing Capability
- Direct Peering at Internet Exchanges
Read more here
Network Health Monitor
MetroNIDs everywhere!
If you value low latency just as much as we do, the Network Health Monitor as an absolute must!
Click here for more information on the Network Health Monitor
Use Cases
Read here how our Services can benefit you
